Dos Ext makes it easy to ensure that the correct PC/Unix file extension is added to the name of all files - essential if your pages are to be 'fetched' by the browser once uploaded to the World Wide Web. The utility has an editable database of filetype->extension translations in its !DosExt.User directory.
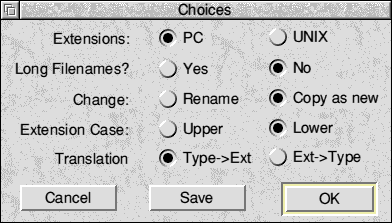
To select the mode used by DosExt, bring up the Choices menu from the program's iconbar menu. The bottom option allows you to select the mode used. The other options apply only to the Filetype->extension conversion which is the primary mode for the utility.

To change the filename/filetype drag the source file on to the DosExt icon on the iconbar. Dragging a directory initiates batch processing (below). If you are in Type-> extension mode, and you have set the action option to copy under the new name, you'll be prompted to save the new file. Otherwise, the conversion will take place automatically.
The Choices window configures DosExt's behaviour. The first option specifies PC or Unix extensions. This is important, as it selects which type-extension database is used. When working with HTML pages on a WWW site, it is best to work in Unix mode, otherwise, use PC mode.
Files with PC or Unix extensions often exceed the RiscOS 10 charcter filename limit. Some RiscOS filer extensions allow for long filenames and these are supported by DosExt if you select this option. Failure to select this option may result in truncated filenames, such as Image001/g rather than Image001/gif. If you decide to use the 10 character limit, then the main filename body will be shortened to allow the PC/Unix extension to be added.
When converting the filenames, DosExt can either create new files with the new filenames, or rename the old ones. The third option allows you to control this.
If you are converting a filetype to an extension, then you may wish to choose the case of the extension used. If you are dealing with PCs, Dos only supports upper-case filenames; Unix, however, supports mixed-case, so the lower-case option is usually preferable.
Finally, you can select the mode used by DosExt (see above)
Batch Processing
In common with ImageConv and StipIt, DosExt supports batch processing. Simply copy all the files to be processed into a directory, then drag the directory over the icon on the iconbar. An hourglass displays the percentage completed during processing.
Load the application and click once over the icon on the icon bar. The main window represents a web browser running in 640 x 480 resolution, the standard on Windows-based platforms and on many other browsers. This is not a restriction, as the frames are stored as percentages and will be scaled for larger display windows.
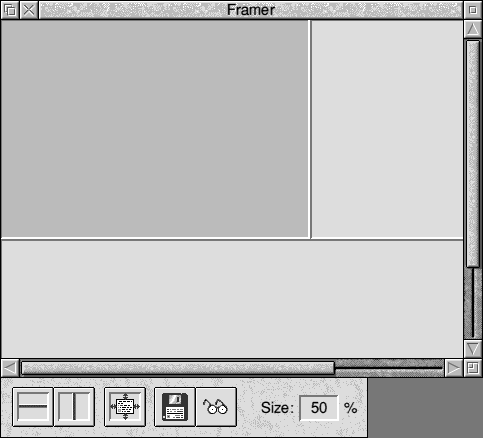
The two buttons at the far left of the toolbar split the main frame up into sub frames. The third button from the left sets the frame's properties. To select a frame, click on it, the size of the frame (as a percentage of the current frameset) is displayed on the toolbar. The edges of frames can be dragged to resize them, within the limits of the current frameset.
To set which file is displayed in the frameset, drag it on to the required frame, or open the frame's properties and drag the file there. If the HTML page of frames is saved to disc, a relative path will be created - this is preferable as the location will be correct. If the HTML page is not yet saved, Framer assumes that the linked page is in the same directory as the main HTML frame page.
Frames bear little or no resemblance to text or graphics frames in DTP applications such as Impression, Ovation or Pagemaker. They cannot be used for the free-form positioning of text or graphics. Rather, HTML frames allow more than one HTML page to be visible on screen at once. For example, a fixed toolbar can be positioned down one side of the screen as a navigation aid to the main document which occupies the rest of the screen, in a scrolling frame.
Alternatively, a small frame may be created along the bottom of the window to provide information on products/phrases/ideas in the main frame, resembling interactive footnotes. With familiarity, frames can be used to create multiple choice tests, interactive catalogues, multimedia presentations and so on.
Framesets contain frames. Framer deals automatically with most frameset issues, but knowledge of some rules is important. Framesets can only consist of frames using the same left/right, top/bottom orientation. They have a set direction, horizontal or vertical and a new frameset must be created if, for example, you wish to divide a frame in a horizontal frameset, horizontally across the middle. Horizontal framesets can only be split vertically, from top to bottom. To split horizontally requires the creation of a 'sub-frameset'. Framer will automatically create sub-framesets when necessary, but resizing a frame border which is shared with a sub-frameset is not possible.
From left to right the buttons on the toolbar:
All frames should be given names, although the main use of the box is to designate in which frame a document should be displayed, to facilitate such operations as clicking on one frame to cause a new document to be displayed in another frame. The HTML code for such a link would be:
<A HREF="filename" TARGET="framename">...</A>
The content filename is the Unix path (filename) for the file which is to be displayed in the frame. It is unnecessary to understand Unix paths - save the page of frames, then drag in the file to display, Framer generates filenames automatically.

The margins for a frame are the inset for the left/right, top/bottom for the contents of the frame, creating an offset from the edge of the frame.
The specified sizes for frames are 'default' values, used when the page is first displayed. The user can then adjust the frames to suit. There may be times when this is not desirable, e.g. with a frame layout designed to achieve a specific effect. Setting the Frame is not resizeable by user flag will disable this frame property.
Save Frames and Create WWW Page options differ only in that the latter will add the HTML header required by all HTML pages, whereas the former will create the frame code only.
Preview is self-explanatory. Delete Frame and Delete Frameset are fairly obvious. Do not use Delete Frameset unless you understand clearly what a frameset is. Frame Properties opens the properties dialogue box for the selected frame.
To convert a sprite file, simply drag it over the ImageConv icon on the iconbar, once you've loaded the application. You will be presented with a series of conversion options, the majority of which are either documented by the software itself, or are made clear by the assistant images in the different windows. That said, there are some features which aren't immediately obvious.
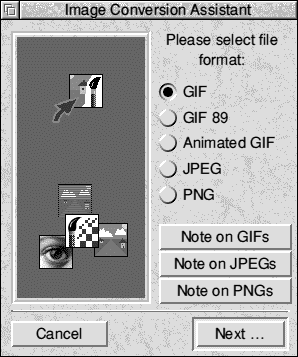
GIF files are usually limited to 256 colours. For this reason sprites with 32,000 or 16 million colour palettes could not, in the past be converted to gifs. HTMLEdit Studio gives you the option to choose GIF89 files, the palettes of which can accept high colour images.
To create a GIF animation, simply drag a sprite file containing more than one image onto the ImageConv icon on the iconbar. You can add sprites to a sprite file very simply using !Paint. Load up the main sprite file, then drag other animation frames into the Paint window. The images will be added, and you can then save the sprite.
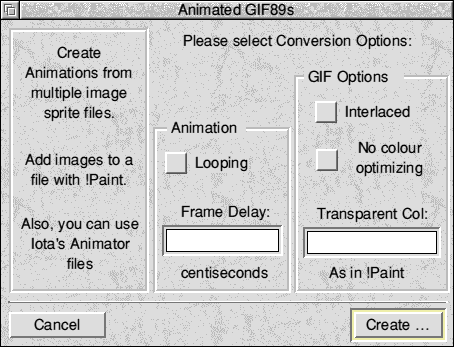
You shouldn't need to touch the colour optimisation button, but it is included for the sake of completeness. Interlacing and transparency are set as for normal gifs and gif89s. Note that transparency is not always very effective for animations, but should be fine for most files.
The file produced will appear as a standard gif, and the first frame will be seen by those without animated gif compliant browsers, but those with suitable software will be in for a treat!
To convert a DrawFile, simply drag it over the ImageConv icon on the iconbar. You will then have the option of creating a sprite or a gif. Sprites are only really useful if (a) you just need to convert the drawfile or (b) if you need to create a JPEG. However, drawfiles are far more effective as GIFs, mainly due to the concept of a 'background' in a draw file. This will be translated into a transparent GIF very effectively and intelligently, making GIF the obvious choice.
The usual options are available for Draw-based GIFs, but you should bear in mind that the NetScape standard palette will be used, for compatibility purposes. This may mean that graduated fills may look a little odd (if you've saved as a drawfile out of ArtWorks) although this shouldn't prove too problematical. You may notice that some colours come out slightly darker or lighter due to this NetScape palette adjustment. That said, the overall quality of the output will be much better than the original, as the drawfile will be anti-aliased during conversion.
One of ImageConv's very powerful features is the ability to batch process image conversions. To use this feature, copy all the files to be converted into a directory, and drag the directory over the ImageConv icon on the iconbar. You will be able to save out a new directory, and then choose the various conversion options. Once done, all the sprite files in the first directory will be converted and saved in the new one.
StripIt has three distinct modes of operation, which can either be selected from the Modes submenu on the iconbar menu, or by clicking on the StripIt icon on the bar until the desired mode is selected.
The default mode strips carriage return ( [0d] ) characters from the file dragged over the StripIt icon on the bar. The output file will be identical to the input version, but missing [0d] characters. This is very useful when importing HTML from WWW pages designed on PCs.
The second mode available will add [0d] characters at each newline in the dragged-on file. The newlines will be retained, but there will be [0d] characters at the end of each line. This mode has several uses - if you're using a PC server, then by adding [0d] characters, the files will be identical to those created on a PC. You may also wish to add [0d]s when saving text for use on a PC. Finally, many image-setters prefer postscript files with [0d]s at each newline!
The final mode is perhaps the most interesting. Known as Paragraph mode, this a formatted text file (such as a WWW page or OCR output), and removes both [0d] and newline characters to produce continous paragraphs. Paragraph breaks, represented by two consecutive newlines, are retained. The output can then be inserted into reports or DTP documents. This makes the transition between WWW work and DTP much easier.
To select the default mode when the software starts up, choose the mode you want, and then click on Set as Default on the Modes menu. The next time you load the utility, that mode will be selected.
Like ImageConv, StripIt supports batch processing. Simply copy all the files to be processed into a directory, then drag the directory over the StripIt mode icon on the iconbar. A save window will appear allowing you to save out a new directory, and this will then contain the processed version of each file. You will see an hourglass showing the percentage completed, during the processing of your files.
WebMapper allows you to create 'clickable' WWW page images, with hot spots, each of which takes you to a different place. Instead of having a separate image for each link, you can have one image, with each area of the image taking you somewhere new.
WebMapper can be loaded in the usual way by double clicking on the program's icon in a filer window. Once loaded, you can activate the program in several ways:
By dragging a gif or jpeg over the WebMapper icon on the icon
By double clicking on a gif or jpeg in a filer window.
Or, if you use HTMLEdit click on the Preview button in the image setup window.
Once you've done one of the above, the image will be displayed in a window, and the toolbar will be displayed. Many of the basic WebMapper operations can be conducted from the toolbar, which also gives you handy information about the current image.
From left to right across the top of the toolbar, the buttons do the following:

To create a hot area on your image, first enter either the rectangular, circular or polygonal creation mode by clicking on the appropriate button on the toolbar. Next, click once on the image to start creating the area, and move the mouse. You will notice that a guide area moves with the pointer. A further click will finish circles or rectangles, but will add another corner to a polygon - right click to finish one of these.
Once you have created the area a window will open allowing you to enter the web address of the page you wish the area to link to. Don't worry if you get this wrong as you can change it later. If the area itself is not to your satisfaction, you can discard the area altogther by clicking on the appropriate button in the web address window.
That's it! You've created a 'hot' area. You can now add more, or set the default URL for the rest of the image, then save your work as a map file.
To move an area around the image, simply enter Select mode by clicking on the pointer button on the toolbar, then, pointing to the area you wish to move, simply drag it with the left button held down until the desired new location is reached.
Most of the menu options are self expanatory, with only the selection menu and default URL needing explanation.
The Shape Info window is available off the Selection sub-menu, and provides details on the type of area, its co- ordinates and the address of the page it links to. This window is provided for reference only.
The Delete option allows you to remove an area from the list of hot spots. Note that this doesn't affect your original image!
To alter the address of the WWW page which the area links to, use the window off the Set URL option on the Selection sub-menu. You will see the selected area's current target, and you can alter this to suit
The most common type of server-side map format is NCSA, and for most users this default will be fine, as it is used by most of the commercial WWW and internt providers (ISPs). This includes most free space offers to users of the big ISPs. However, a small amount of servers use the so-called CERN format, and this includes some of the educationally orientated ISPs, so you may find that you have to change from the default. Note that there is only one format for client-side maps.
To change the format created by WebMapper, click on the Choices option on WebMapper's icon bar menu. You can choose whether CERN format is used, and whether the program defaults to client or server side maps. Once you've chosen what you want, simply click on OK, or save your settings as the default ones. When you save your server side map next time, it will be in the format you selected.
The only way to test an image map is to actually put the web page and map onto an Internet WWW server. However, you can check to see if the image is 'active' by loading it into a WWW browser which displays the target URL as you move the pointer over the WWW page. The active image should give the co-ordinates of the pointer relative to its top left corner.
Note that the active image in the WWW page needs the ISMAP parameter in addition to the usual <IMG SRC=""> tag - ie. <IMG SRC="" ISMAP >
Alternatively, HTMLEdit users can simply tick the image map button!
You also need to set up the hypertext link for the map file. This is VERY strange, so watch carefully!
<A HREF="http:// www.your_domain.com/cgi- bin/imagemap/map_name">
OK, so to explain - replace the www.your_domain.com with the appropriate address for your web site. The next two parts of the address specify the image map program. The final part, the map_name looks as if it is part of the UNIX path. In fact it is the path (or name) of the map file. It is passed to the imagemap program using this perculiar 'path-like' syntax. Refer to specialist HTML documentation if this isn't clear, or, preferebly, check with your WWW space provider.
You should save the client-side HTML codes out of WebMapper and insert them into the HTML page on which the image is displayed. You must give the map a name - either fill this in later (see tag below), or type it into the client-side save box in WebMapper when saving.
<MAP NAME="#mapname">
You will then need to alter the image tag used to display the image:
<IMG SRC="" USEMAP="#mapname">
If you are using an HTML authoring package such as HTMLEdit you should be able to enter the name of the map to use into the image setup window.
You can start a new table by clicking on the WebTable icon on the iconbar. This leads to a window allowing you to choose the starting dimensions for the table. You can insert and delete rows and columns from within the main editor, so this need only be a rough approximation to the size of table. Obviously you should choose a size which corresponds pretty closely to your final layout, as this will make the table far easier to handle.
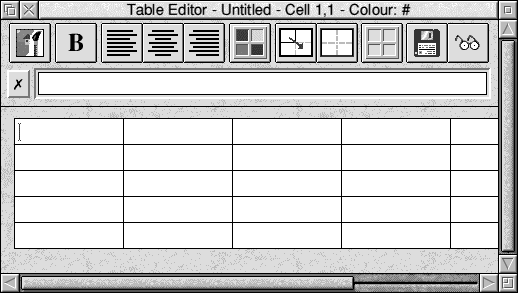
From left to right, the icons on the toolbar correspond to the following actions:
If your table contains images, or links to other documents, WebTable will give you the option of using an external file to preview from, stored in the same directory as the main table. This will allow the images to appear correctly, and links to function normally. An external file is used because tables may form part of a larger page. It would be unwise for WebTable to save the table automatically, in case other data was lost.
If you choose for WebTable not to use the external files, a temporary scrap file will be used as normal, but images and links won't appear/work correctly. You can choose to set the preview method as the default for that table by clicking on the appropriate button in that window.
To select a range of cells, simply click once in the start cell, and then click once with the right mouse button in the finishing cell. The software will handle any combination of start and finishing cells, so don't worry if the start cell isn't the top left of those you are selecting! WebTable will automatically adjust the range if it includes joined cells which would otherwise protrude from the selected region, as not doing so could cause unpredictable results, especially in the case of cell joining!
HTML has no concept of size when it comes to table cells. With traditional DTP software, you would specify the cell size in centimetres or inches on a cell-by-cell basis. In HTML cell size is adjusted based on the length of the cell content, the surrounding cells, and the width of the viewing window.
To simplify this rather complex situation, if you assume every cell to be the same size, you can't go far wrong, although obviously some colums will end up slightly wider than others (and some rows deeper).
WebTable shows all the cells with a fixed width, but obviously the content can be much greater than this, as the Web Browser will adjust the formatting to suit. The large cell below the toolbar can be used to edit a cell's content if it is larger than the standard cell size. If you click on any cell, its content will be displayed in this large editing field.
To add an image to your table, simply drag it into the cell you wish to include it in. Note that WebTable allows you to mix text and images in cells. If you drag in a sprite or a draw file, you will have the option of converting it into any of the WWW graphics formats supported by the ImageConv utility.
After any conversion has taken place, the Image Setup window will open with the image's details filled in. Provided you have saved your table, the correct relative path for the image will be added as well. Clicking on OK will insert the image tag into the cell you dropped it into.
Alternatively, if you wish to add an image to the current cell, simply click on the image button on the toolbar to reach the Image Setup window.
Most of the menu options are self explanatory. The Save Table option just saves the raw HTML for a table, whereas the Create WWW Page option actually adds all the HTML headers and footers required to turn your table into a fully fledged HTML page.
The selection menu is simple enough. Note that even if it isn't highlighted, the cell with the caret in is always regarded as being 'selected'.
Row alignment probably warrants an explanation. This is a neat HTML tabling trick which allows you to specify the alignment of all the cells in a row individually. Because of the way HTML works, with tables being defined as a series of rows each containing several bits of data, only rows can be aligned in this way. Anyway, by specifying the alignment for the whole row, the alignment is only included in the HTML once per row, producing much neater and more compact code. This is good news for people looking at your page!
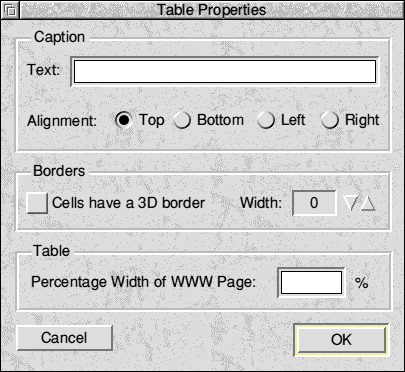
Your HTML table can have a caption which describes its contents. You can choose its position, but bear in mind that not every browser which supports tables necessarily supports table captioning. That said, WebsterKL and Fresco for RiscOS, and both Nestscape Navigator™ and MS Internet Explorer™ all support captioning.
You can also specify whether the table cells have a 3D border or not. This can only be set on a 'global' scale, and not for individual cells - another HTML limitation. You can only have a 3D border or none at all. If you select to have a border, but leave the width at 0, the browser will determine a suitable width itself.
Finally, by specifying the percentage width of the WWW browser display which your table will take up, it is possible to avoid the idiosyncracies of certain browsers when it comes to table formatting. If you've had problems with cells running to two lines, but the table only occupies about half the browser display, choose a percentage width here!
You can load existing tables by dragging them over the WebTable icon on the iconbar, but there is no guarantee that tables not created by either WebTable or HTMLEdit will be readable. This is because HTML is such a 'fluid' language, and there are many bad examples of tables out there, which may miss important tags, or do slightly strange things to achieve certain effects. Please remember that WebTable is NOT a Web Browser, but a visual editor for tables, hence the preview options!